
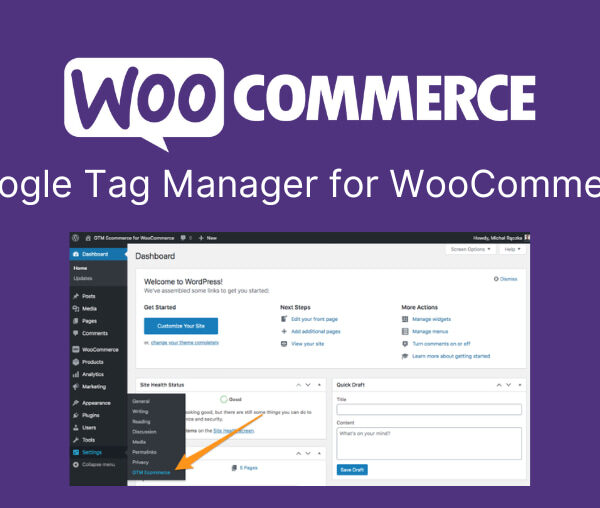
GTM Google Tag Manager for WooCommerce PRO 1.17.1
Original price was: $19.99.$9.99Current price is: $9.99.

WC Vendors WooCommerce Bookings 1.4.5
Original price was: $19.99.$9.99Current price is: $9.99.
-50%

-
 100% Original - All Premium Features Included.
-
 Unlimited Site & Domain Usage
-
 Safe & Secure

Related Products

Elementor PRO WordPress Page Builder + Pro Templates 3.34.0
In stock
Original price was: $19.99.$9.99Current price is: $9.99.
WoodMart Theme Responsive WooCommerce WordPress Theme 8.3.9
In stock
Original price was: $19.99.$9.99Current price is: $9.99.

Wordfence Premium – WordPress Malware Scanner 8.1.4
In stock
Original price was: $19.99.$9.99Current price is: $9.99.

Astra Pro Addon For Astra Theme 4.12.1
In stock
Original price was: $19.99.$9.99Current price is: $9.99.

PlugCart –
Ninja Forms Layout and Styles Extension
Ninja Forms Layout & Styles extension offers you the ability to create very complex form layouts and styles by default and on a per form basis but understanding the order in which the styles are applied is crucial to getting the most out of this extension.
Ninja Forms Layout and Styles GPL Features:
Adding Styles – Whether you are editing the default form styles, default field styles, field style types, error styles, or the individual field styles, you are presented with many of the same options. In this document, I hope to explain the basics of CSS that you might need to know in order to unleash the power of the Layout & Styles extension for Ninja Forms.
Basic CSS Properties – While we may add more in the future, here we keep the basic elements that are available for you to style your form elements.
Background Color – This offers a very simple color picker for you to either dial in a selected color or type in a HEX color value.
Border Width – This can accept from 1 to 4 values. Check the following examples: Border Color. This offers a very simple color picker for you to either dial in a selected color or type in a HEX color value.
Text Color – This offers a very simple color picker for you to either dial in a selected color or type in a HEX color value.
Height – Choose the height of your element with an integer followed by px or %. As in 500px or 100%.
Width – Choose the width of your element with an integer followed by px or %. As in 500px or 100%.
Advanced CSS Properties – These are items you may not need as often for the average user, but we include them in case you would like a little more control.
Float – This accepts either left, right, or none.
Font Size – This will most often be an integer followed by px or em. As in 16px or 1 em.
Margin – This can accept from 1 to 4 values. It adds whitespace on the outside of what you apply it to as long as it’s a block-level element. Check the following examples: Padding This can accept from 1 to 4 values. It adds whitespace on the inside of what you apply it to as long as it’s a block-level element. Check the following examples:
Advanced CSS – This option is for those who are well versed with CSS or don’t mind experimenting. Here you can write in any rules that you wish, just like you would if you were writing CSS within its own file.
Layout & Styles Hierarchy – Ninja Forms Layout & Styles extension offers you the ability to create very complex form layouts and styles by default and on a per form basis but understanding the order in which the styles are applied is crucial to getting the most out of this extension.
To begin, when you install the Layout & Styles extension you will get a Styling sub-menu under your Ninja Forms Menu. When you click on that you will see 4 tabs and these represent Ninja Forms default styles. When you set these options they will be applied in a very specific order.
Form Styles Tab – This tab represents the defaults for the elements of your Ninja Forms. Things like the main container, rows, and the success message are set here and are applied to every form that you create with Ninja Forms so be sure you want these styles applied to every form before you proceed.
Default Field Styles Tab – When you create a field or any other element with Ninja Forms it creates certainly required output. A wrapping div around a label and the actual element. The only exceptions are layout elements where there is no label and perhaps no wrapping div, in which case only the Element Styles will apply.
In any case, these styles apply to ALL fields created in Ninja Forms regardless of type. Again if you don’t want it applied to absolutely everything use this option sparingly.
Field Types Styles Tab – Here you will be presented with the same options as the Default Field Styles with the addition of the option to select a specific field or element type. This mean you can style all your text boxes one way and all your Submit buttons another way. Basically, you can create default styles for every type of item Ninja Forms allows you to create.
Error Styles Tab – If the form is not completed properly there are messages that are displayed at the top of the form as well as with each field that has an error attached to it. This will let you style these messages and fields that have errors for all of your Ninja Forms.
Understanding Hierarchy – Basically, the more specific you are, the more weight is applied to that style. With this in mind, Field Types Styles have been applied first then Default Field Styles. Keep this in mind when things don’t seem to appear the way you think they should.
Changing the Number of Columns in a List using a class name – You can use the class name NUMBER-col-list as the list field container class name under the list field options.